2010-02-26 21:45:40
Fix A Corrupt Windows Registry With Linux
During this past week I was called upon by two different people to help with their computer problem. The first problem was a Blue Screen Of Death (BSOD) and the second problem was an inability to login without immediately being logged out. Before I get to the solution, let's see how I diagnosed each of these.The Problems
In the first problem, the computer (running Windows XP) would start to boot. It would make it past the initial Windows logo with the scrolling bar, however right when the login screen was supposed to appear the person was instead presented with a BSOD.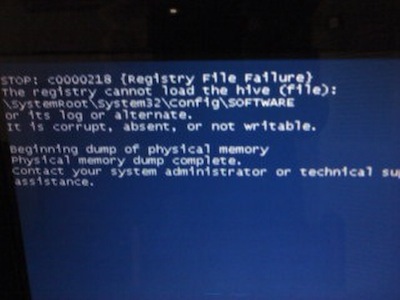
That error makes this case easy to diagnose, the registry is corrupt. I know this because the error specifically says, "The registry cannot load the hive (file) ... It is corrupt, absent, or not writable." So I now know that I have to get the registry back to some working state.
The second problem was not so simple. The machine would boot properly and you would get a login screen. Upon clicking on a username, it would appear to log you in, display the wallpaper, but would stop completely. Not even an CTRL+ALT+DEL could open Task Manager to manually start Explorer. So, my first instinct is that this user's profile is corrupt. But before we go moving profiles around, let's try another user. Upon trying to login as the Administrator, a similar situation occurs. In this case, however, the user is immediately logged out of the system before the wallpaper is even displayed. Now I know that this is not a case of a single corrupt profile, this is also a corrupt registry.
The Solution
Now the fun part, the solution. It is important to note that this procedure makes two basic, yet extremely important assumptions: the system has System Restore enabled and you have a Knoppix CD/DVD with NTFS support. (Yes, I could have done this process using the Windows Recovery Console, however that would make the situation take about an hour longer and most people have lost their Windows CD.)The goal of this exercise is to grab working copies of the registry hives from within the System Restore folder (from a day where the system was actually functioning) and put them in place of the corrupt hives.
Step One: Boot your Knoppix CD/DVD
Step Two: Mount the Windows partition as read/write
Upon getting your Knoppix desktop, you will see an icon for /dev/hda1 (or something similar, depending on what type of hard drive you have and on which partition your Windows install is located). Do not click this icon. If you do, the Windows partition will be mounted as read-only, which is not what you want. We need to edit /etc/fstab so that the partition is mounted as read/write.
- Open a root terminal (usually done by clicking the Penguin on the taskbar and choosing "Root Terminal").
- vi /etc/fstab
- Arrow down to the line that contains "ntfs" (usually the last line). Take note of the mount point on this line (usually /media/had1 or /mnt/hda1).
- Right after "ntfs" is a long string of options; place your cursor on the first character of that string, hit "i" to get into Insert mode, then type "rw,". This will add the read/write option to the list of mount options so that when we mount this partition we can write to it.
- Hit ESC to exit Insert mode.
- Enter ":wq" and hit enter to write the file and quit vi.
- mount /media/hda1
- Use whatever mount point you saw in step 3.
- cd /media/hda1/System\ Volume\ Information
- ls -la
- Find a directory that starts with "_restore" and has a timestamp before the date that the computer stopped functioning properly and enter that directory
- cd _restore{97327677-27B7-45CE-B159-91DBE2827A02}
- Locate a snapshot folder in one of the "RP" folders
- cd RP1/Snapshot
- cp _REGISTRY_MACHINE* ~/Desktop
- cp _REGISTRY_USER_.DEFAULT ~/Desktop
- cd ~/Desktop
- mv _REGISTRY_MACHINE_SECURITY security
- mv _REGISTRY_MACHINE_SOFTWARE software
- mv _REGISTRY_MACHINE_SYSTEM system
- mv _REGISTRY_MACHINE_SAM sam
- mv _REGISTRY_USER_.DEFAULT default
- cd /media/hda1/WINDOWS/system32/config
- rm default sam system software security
- Some of these may be uppercase and some may be lowercase. Do an `ls` to be sure you actually delete the files.
- cd ~/Desktop
- cp security /media/hda1/WINDOWS/system32/config
- cp software /media/hda1/WINDOWS/system32/config
- cp system /media/hda1/WINDOWS/system32/config
- cp sam /media/hda1/WINDOWS/system32/config
- cp default /media/hda1/WINDOWS/system32/config
Step One: Boot into Safe Mode
After rebooting your computer and after the POST finishes, hit F8 to display a boot menu. Select Safe Mode from this list.
Step Two: Run System Restore
Upon logging in, you will receive a popup box saying to click "Yes" to work in Safe Mode or "No" to perform a system restore. Select "No".
Step Three: Restore to a previous date
From the displayed calendar, select the same date as the timestamp on the hives you copied in the earlier steps and restore to that date.
The system will automatically finish the restore and reboot, at which point you should be able to log back into your system.
Back